
![]() +86 18126095160
+86 18126095160
![]() bella@noparde.com
bella@noparde.com


2026-03-02 1
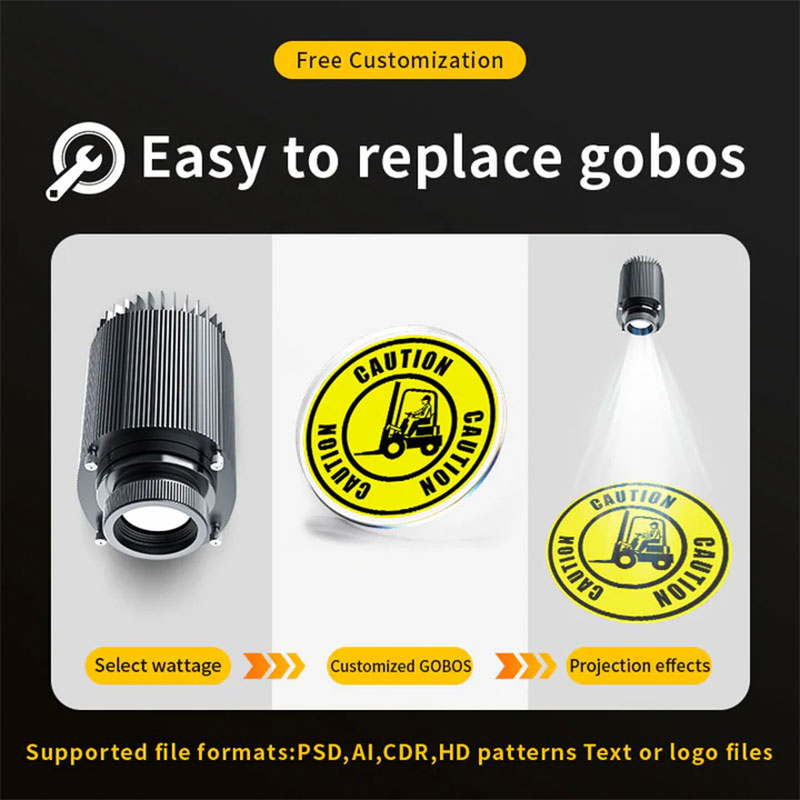
If you own a gobo projector—whether for business branding, holiday decor, or event ambiance—you’ve likely faced a common question: What’s the easiest way to replace custom gobo slides? For many users, especially those new to gobo projection, swapping out custom slides can feel intimidating. Will you damage the projector? Do you need special tools? How long will it take? The good news is that replacing custom gobo slides is simpler than you think—even for beginners—when you follow the right steps. In this guide, we’ll break down the easiest, most straightforward method to replace your custom gobo slides, share pro tips to avoid common mistakes, and include a real user case to show just how hassle-free the process can be. Plus, we’ll highlight why Noparde gobo projectors are designed to make slide replacement even easier, perfect for both home and commercial use.
First, let’s clarify what a custom gobo slide is. A gobo (short for “go between”) is a thin, precision-cut slide—usually made of glass or metal—that fits inside a gobo projector. When light passes through the slide, it projects a custom image, logo, or pattern onto walls, floors, or ceilings. Custom gobo slides are popular for businesses looking to project their brand logo, event planners creating themed ambiance, or homeowners adding personal touches to holidays or gatherings. Over time, you may want to swap out slides for new logos, seasonal designs, or different events—and doing this quickly and easily is key to getting the most out of your gobo projector.

Before we dive into the step-by-step process, let’s address the most common fears: damaging the projector or the gobo slide. The truth is, with a few simple precautions, you can replace slides in 5–10 minutes without any risk. The easiest way to replace custom gobo slides relies on three core principles: safety first, minimal tools, and following the projector’s design. Most modern gobo projectors—including Noparde’s lineup—are engineered with user-friendliness in mind, so you won’t need technical expertise or specialized equipment.
Let’s start with the prep work. Before replacing your custom gobo slide, always turn off the projector and unplug it from the power source. This is non-negotiable—gobo projectors use high-intensity bulbs that get extremely hot during use, and touching the bulb or internal components while they’re warm can cause burns or damage the projector. Allow the projector to cool down for at least 10 minutes (15 minutes if it’s been running for more than an hour). While you wait, gather your new custom gobo slide and a soft, lint-free cloth—this will help you handle the slide without leaving fingerprints, which can blur the projection.
Now, let’s walk through the step-by-step process—the easiest way to replace custom gobo slides, tested and proven by users worldwide, and aligned with Noparde’s intuitive design:
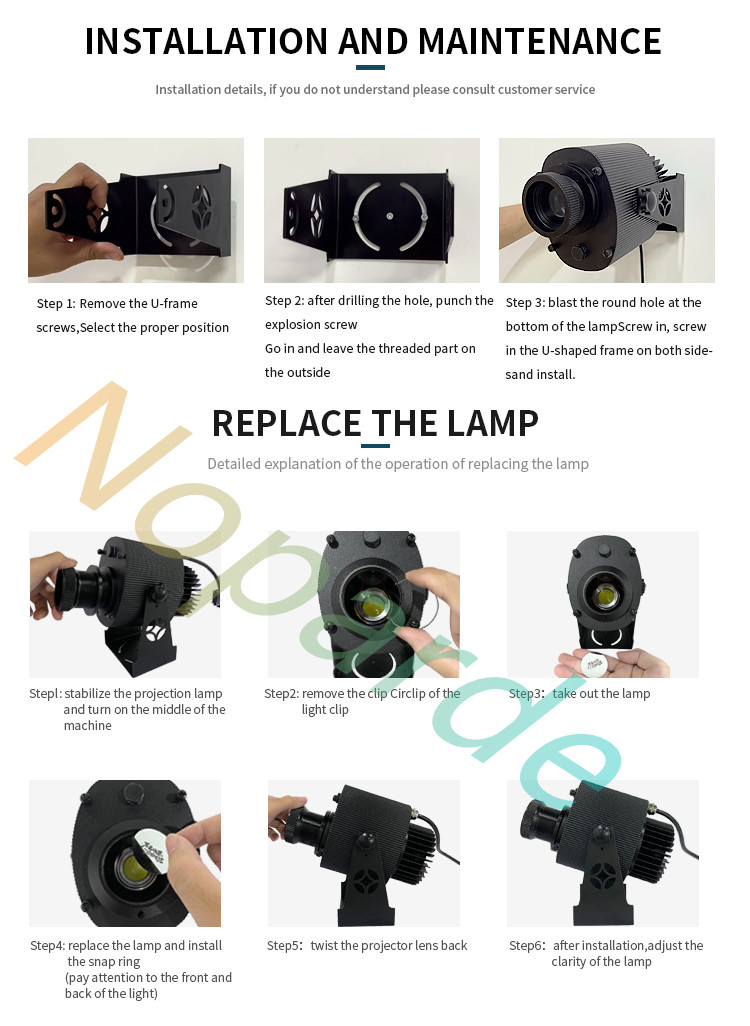
Step 1: Stabilize the projection lamp and access the gobo compartment
Start by placing the projector on a flat, stable surface to prevent it from tipping during the process. On Noparde projectors, the gobo compartment is typically located at the front of the unit, behind the lens assembly. Gently twist the projector lens counterclockwise to loosen it, then pull it forward to expose the internal gobo holder. This step is designed to be tool-free, so you won’t need any extra equipment to access the compartment.
Step 2: Remove the retaining clip from the gobo holder
Inside the compartment, you’ll see a small retaining clip (similar to a circlip) that secures the gobo slide in place. Use your fingers to gently pry the clip open and slide it out of the holder. Noparde’s projectors use a flexible, easy-to-manipulate clip design, so you won’t need pliers or other tools—just a light touch to release the gobo.
Step 3: Take out the old gobo slide
Once the clip is removed, the old gobo slide will be loose in the holder. Carefully lift it out using the lint-free cloth to avoid touching the surface directly. If the slide is stuck, gently wiggle it from side to side—never force it, as this could scratch the slide or damage the holder. Set the old slide aside in a clean, dry case to protect it from dust and scratches.
Step 4: Replace the gobo slide and secure the retaining clip
Take your new custom gobo slide and align it with the gobo holder, making sure to note the front and back of the slide (most gobos have a small notch or indicator to show the correct orientation). Place the slide into the holder, then reinsert the retaining clip to secure it in place. Double-check that the slide is seated flat and centered—misalignment can cause blurry projections or damage the slide during use.
Step 5: Twist the projector lens back into place
Once the new gobo slide is secured, reattach the projector lens by twisting it clockwise until it clicks into place. This ensures the lens is properly aligned with the gobo, which is critical for clear, sharp projections. Noparde’s lens design features a precision thread, so you’ll feel a slight resistance when the lens is fully seated—this is a good sign that it’s locked in correctly.
Step 6: Adjust the clarity of the projection
Plug the projector back in, turn it on, and test the projection. If the image is blurry, use the focus knob (usually located on the side of the projector) to adjust the clarity until the gobo pattern is sharp and well-defined. Noparde projectors feature a smooth, responsive focus system, so you can fine-tune the projection in seconds to get the perfect look for any space.
That’s it! This 6-step process is the easiest way to replace custom gobo slides, and it works seamlessly with Noparde’s gobo projectors. To illustrate just how simple it is, let’s share a real user case: Sarah Johnson, owner of a small café in Chicago, uses a Noparde custom gobo projector to project her café’s logo onto the outdoor patio wall nightly. She swaps out the slide seasonally—using a snowflake design in winter, a flower pattern in spring, and her logo year-round. “I’m not tech-savvy at all, but replacing the gobo slide takes me 5 minutes flat,” Sarah says. “The compartment is easy to access, the clip slides out smoothly, and I never have to worry about damaging anything. It’s so simple that I can do it between serving customers.”
Now, let’s highlight why Noparde gobo projectors make slide replacement even easier—designed with the user in mind. Noparde’s gobo projectors feature a tool-free gobo compartment (on most models), so you don’t need a screwdriver to open it—just a simple twist of the lens. The gobo holder is made of durable, non-scratching material, so you won’t damage your custom slides during replacement. Additionally, Noparde provides custom gobo slides that are pre-cut to fit their projectors perfectly, so you never have to worry about the slide being too big or too small. The company also includes a lint-free cloth in the box, so you have everything you need to replace slides right out of the box.

To avoid common mistakes, keep these pro tips in mind: Never handle the gobo slide with your bare hands (fingerprints are the biggest cause of blurry projections). Always let the projector cool down completely before opening the compartment (hot components can warp the slide or cause burns). Don’t force the clip or slide into place—if it’s not fitting, check the orientation and try again. And store your extra gobo slides in a clean, dry case to prevent dust and scratches.
Whether you’re a business owner swapping out brand logos, an event planner changing themes, or a homeowner updating holiday decor, replacing custom gobo slides doesn’t have to be a hassle. The easiest way is to follow the simple 6-step process above, choose a user-friendly projector like Noparde, and take a few basic precautions. With practice, you’ll be able to swap out slides in minutes, ensuring your gobo projector always delivers the perfect projection for any occasion.
In summary, the easiest way to replace custom gobo slides is: Stabilize the projector, access the gobo compartment, remove the retaining clip, take out the old slide, insert the new slide and secure the clip, reattach the lens, and adjust the clarity. It’s that simple! With Noparde’s user-friendly design and this step-by-step guide, you’ll never dread replacing your custom gobo slides again—instead, you’ll look forward to updating your projections and making every space shine.